
 With the huge discounts going on during the start of the camping season in Australia, it’s no wonder Mum or Dad are looking for Coleman Montana 12CV Deluxe Tent Reviews. Within this review of the gold series family tent by Coleman you will see first hand how well it survived on it’s first 4 night camping trip to Byron Bay NSW.
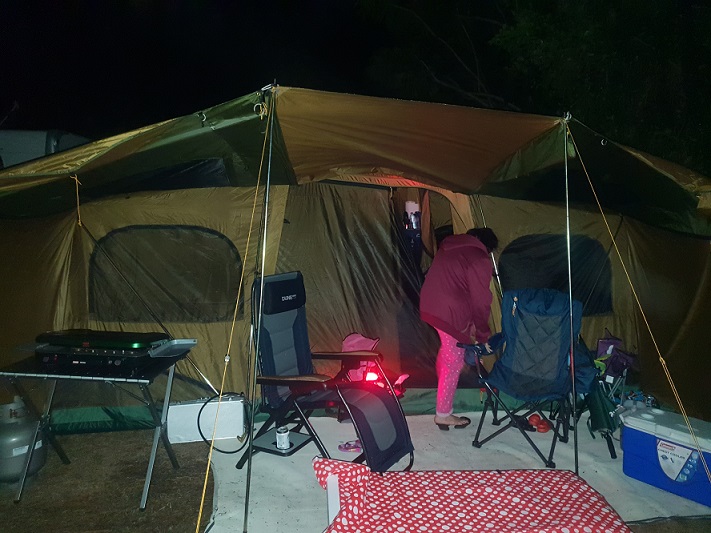
The Coleman 12 Man Montana tent is a huge family tent without any form of exaggeration. It was almost like staying in a Hotel with its very spacious 3 room design. The kids did not complain once!.
For this review and our trial run there were us two parents and our three young children which range in ages from 3 to 8. However this tent is big enough to fit a few more in if you need too, but we choose to use the middle room as our food pantry and storage area for bits and pieces. Ideally this is a great 6 person tent due to the 3 large rooms.
Quick Review Of The Montana Gold Series 12 Person Tent
- Very large – holds 3 queen airbeds with space to walk
- 100% Waterproof
- Ample storage pockets and hanging hooks for lanterns
- 4 doors which includes doors on the front/back and both ends.
- 3 room tent with doors in each tent.
- Air vents and large windows with partly mesh ceiling for air circulation.
- Huge front canopy/awning for entertaining area.
- Electrical ports which go to all three rooms.
- Includes bonus LED light.
How Big Is The Coleman 12 Man Montana Tent
Because this is a family tent, the most common question to get from concerned parents is how big is it and will it be able to sleep the entire family. So this Montana is a 12 person tent. Technically you can squeeze 12 people inside the tent, but don’t expect much wiggle room.
The best way to get a visual on how big this tent really is, imagine 3 Queen air mattresses laying side by side with a small walkway between each bed. Along the ends of the beds is about 2 foot of space to put your belongings.
This is the basic rectangle design of the tent. It is split into 3 rooms and each room can hold a queen air mattress fully blown up and still have a walkway around the bed. We used the Coleman double high Queen airbed. Even tho it was double the height of a regular airbed, we still didn’t lose any space in the room.
This is because the walls of the tent have just the right angle on them so that camping cots and double high airbeds won’t be restricted by walls that come down on a 45° angle. In fact we had the double high airbed right up against the wall with our heads sleeping on the wall end. Never once did we feel the tents walls on the top of our head or on our faces.
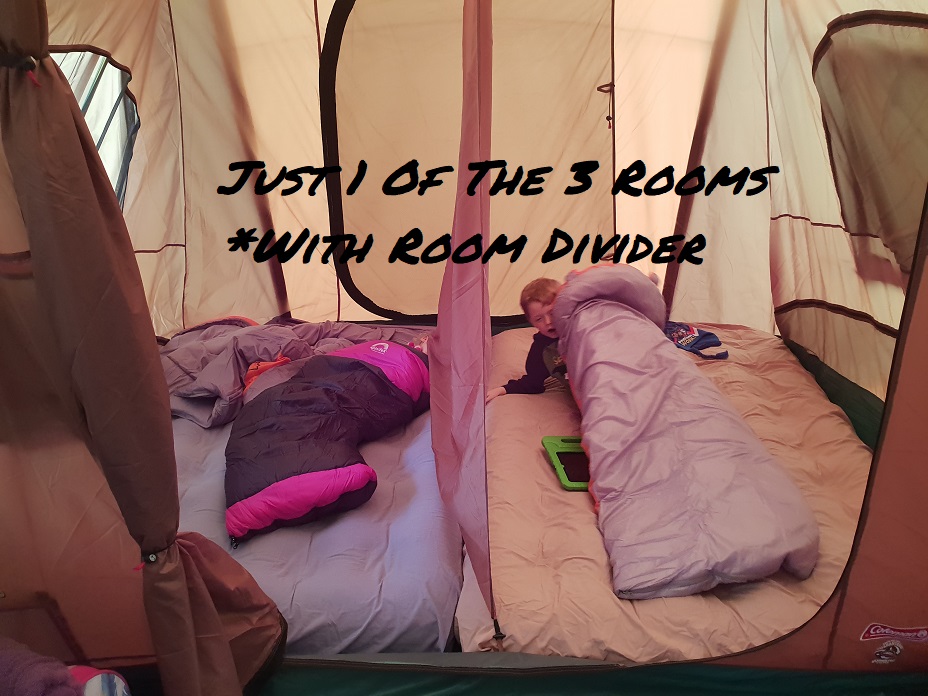
Wall Dividers Inside The Tent
Besides the generous size of the Gold series Coleman 12 man Montana family tent, the thing that appealed the most to me was the built in wall dividers. Between each room are wall dividers which can be completely zipped up for privacy between each room.
When you don’t need the wall dividers up you can unzip them and tie them back on the included clips. In the end room there’s also another wall divider. However this one is not permanently attached to the tent. What it does is turns one of the end rooms into 2 rooms. This is a sheet of tent material which it attached in each four corners via the clips.
This was a genius idea I thought as it allowed us to separate the kids. Girls on one side and boys on the other side of the temporary room divider. We had 2 x full size air mattresses side by side in this one end of the tent for our kids.

Protection From Mosquitoes
Those pesky bugs seem to find their way inside any tent regardless of the steps taken to get rid of mozzies. Somehow one mosquito is always determined enough to go though hell and high water to sneak in and join the party inside the tent.
Whats good about the Deluxe 12 person Montana is that every window, door, air vents and even the room dividers have both no-see-um insect netting and tent wall material. So if it’s hot you can un-zip the windows cover from the inside and still have mosquito netting up.
The tent also has 2 large air vents located on the back of the long side of the tent. When you put the rainfly up you can peg these out so air can flow inside the tent from the ground up. When you’re inside the tent you can un-zip the tents wall material to open it up. Behind this is another layer of insect netting.
The wall dividers between the 3 rooms also have insect netting. The netting and the dividers are attached to the same frame work . So you can use one zipper to take down the privacy divider and leave the insect netting up. Or you can un-zip another zipper just below the privacy zipper and this will the insect netting which is still attached to the privacy divider. This allows you to walk from room to room.
But in the case of remaining mosquito free, you will want to have the insect netting divider walls up at all times. So if a Mozzie does come in through the main entrance it can’t go hide in the end 2 rooms. Overall I find this tent to be extremely well designed for both air circulation and protection from mosquitoes.
Is The Coleman 12CV Deluxe Montana Tent Waterproof?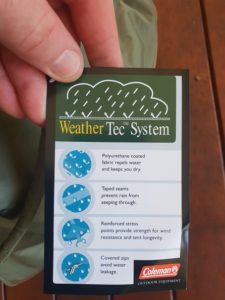
So far in this 12cv Montana Coleman tent review we have discussed how it’s a very spacious family tent with great privacy features, air vents and superior protection from the annoying insects. But is the Coleman 12cv Montana tent waterproof and wind proof?.
Like all tents designed for rain protection, the Coleman Montana claims to be waterproof. Unfortunately for us we camped 3 out of the 4 nights in rainy conditions. It was quite the welcome to Byron Bay. Rain all day and rain all night.
Luckily for you tho, I can assure you that the Coleman Montana deluxe tent is waterproof. Not a simple drop of water found it’s way inside the tent except for the one occasion.
So The Deluxe Montana Isn’t Waterproof?
Ok so the tent held up fine against heavy rain and roughly 30kmph winds while we were camping along the most eastern coast of Australia. But there was one time when the tent managed to leak water and this was due to me not reading the red warning sticker in the front entry of the tent. DUH!
So we set up the front canopy for this tent so we could have shade and protection from light rain. Boy does this tent the best front porch on any tent I’ve ever owned. However there’s one downside to having the front awning up like this.
Brilliant Awning On The Montana But…
Rain can pool up on top of the awning. Because the awning is actually the rain-fly part of the front wall of the tent, water pools up on the window areas of the awning. Under neath the window section of the rain-fly are the zippers. Which when the awning is down you can open up the windows for light and air as you expect.
Awesome except for the fact rain can leak through the zippers of these windows when used as an awning. Becasue the water pools up on top of the zippers. Which it did. Not heaps of water leaked through, but enough to drip down onto our camp chairs and table etc.
Had I read the warning label next to the front entry, I would have noticed Coleman warning me about the water pooling up on these windows like this. But anyways, it wasn’t a huge leak and it just meant we couldn’t sit underneath the window section of the awning while outside.
In case you’re worried, no the windows don’t leak water through the zippers when the rain fly is down as it should be when not being used as a awning. The zippers are actually protected with the flap against rain, just not horizontally pooled up water.
Waterproof Features Of The Coleman Montana 12 Man Tent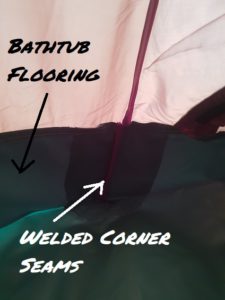
With that out of the way, lets briefly look at what the waterproof features of this tent are.
- Polyurethane coated rain-fly which stops moisture from penetrating into the tents material. Instead it runs off.
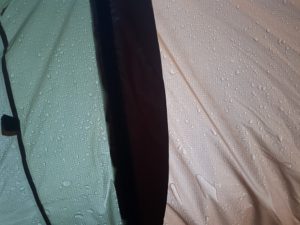
- Zippers are covered with the rain-fly flap so rain can’t enter through the tiny holes of the zippers.
- Taped seams. This is a fine film of waterproofing agent that looks like clear tape. It is applied to the inside of the rainfly so water can’t seep in through the tiny holes in the seams.
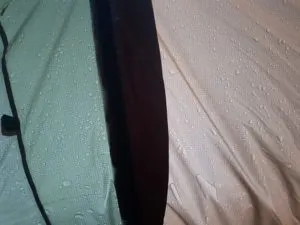
- Welded corner seams on the floor (no holes for rain to enter as they are welded together).
- Bathtub flooring. Simply a must if you are camping during wet season.
Aside from the minor awning mishap, this tent held up beautifully against 3 days/nights of rain. While the seams are tapered already, adding an additional coat of seam sealer will only help the cause further. I only had a small bottle of seam sealer at the time, so I only had enough to seal the exterior of the rainfly in the corner joints and front door entry area. Yet the tent didn’t leak a drop. So when you buy as is, the tent is pretty much guaranteed to keep you dry.
Storage & Other Features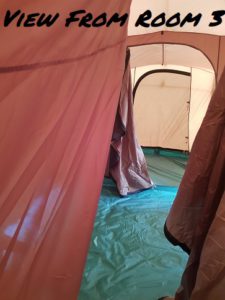
I really didn’t realize how much I would appreciate the ample storage pockets this tent offers. But am I am super glad Coleman had my back here. Each room has it’s own assortment of pockets. Perfectly located for when you’re laying down you can put your keys, smart phone etc in.
The pockets are varying sizes which is really good. There are larger pockets to fit your wallet/purse and medium size pockets for a flash light or you phone. Then there are smaller pockets for storing your keys or any medical devices you may need such as an asthma puffer.
The pockets really were very handy. Each pocket had a use and they made finding items that much easier, especially in the dark.
Hanging Lantern Hooks
Another brilliant feature that I overlooked initially was how many hanging hooks there were. Some tents have no hanging hooks or one if they are lucky. This tent had multiple hanging areas for lanterns to light up the tent. The center room which we used as a kitchen of sorts has a few ceiling hooks in the corners and in the center. This made lighting up the main area of the tent very easy.
Another little bonus feature is the included LED light. This is a little light which is attached to the front center door. So when you get up in the middle of the night and need some light to unzip the door, you have quick and easy access.
Very Tall Tent Ceilings
When I say tall, I mean out of this world tall. The center room is so tall I could not touch it with my arm fully extended. So there is ample head space in this tent. The 2 side rooms are a little shorter, but still high enough to walk around in without hitting your head.
Coleman Montana 12 Setup Instructions
If after reading my Coleman 12cv Montana deluxe review you are seriously considering buying this tent, then make sure you bookmark this page. Simply for the reason of the following setup instructions.
If you’re an experienced camper then assembly will be no problem. The 12cv Montana tent is a Instant tent so you can have the main area of the tent up in a couple of minutes. But if you are new to camping, then the instructions that come with the tent can be a bit questionable.
So to make the Coleman Montana 12 setup instructions clearer, follow these simply steps.
Assembly Step 1.
Always assemble your tent at home first before you go camping. This will make setting up the tent when arrive much easier. For example, when we arrived at Byron Bay rain was forecast for the whole day. We got there with 20 minutes to spare. Had I not set this tent up at home the day before, I would have got drenched as well as the inside of the tent.
First take out all the poles, pegs repair kit etc. First identify the inner layer of the tent, not the rain-fly. This will include the thick and durable green flooring. Next lay this section out into a huge rectangle with the bottom of the tent face down on the grass.
Now you can peg the four corner of the tent so that it is in position. Next grab the green poles, not the aluminum poles with green ends, but the full green poles and attach them together. There will be 2 full green poles in total. Now assemble the aluminum poles with green ends and put them aside. There will be four of these poles.
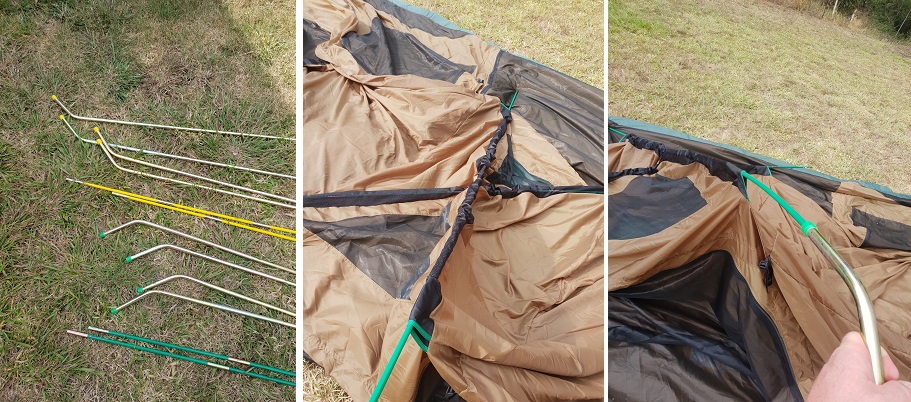
Step 2. Green Poles
Now in the center of the tent will be 2 sections marked in green. These two sections are where you slide the fully green poles through. They will make a X shape once inserted.
Now comes the difficult part, standing the tent up. I highly recommend a second person on the other side of the tent to help. One person stands in the center along the long side, while the other person is on the center on the other long side of the tent.
Next you need to connect the aluminum poles with green ends to the already inserted fully green poles. The aluminum poles have a hook bend on the end. This hook bend creates the roof of the tent once it is inserted into the green poles. Each person does one pole on each side. The ends of the aluminum poles then clip into the pins on the ground level of the tent. This will completely stand the tent up. Next do the same to the other green poles.
Step 3. Yellow Poles
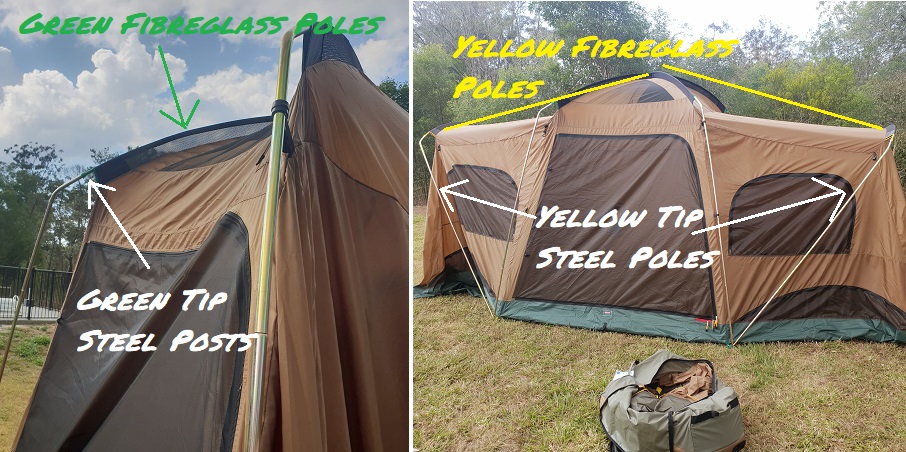
Now that all 4 aluminum green tip poles are holding the tent up you just need to do the same process again, but with the yellow poles. The yellow poles support the 2 ends of the tent. So look for a section on the top of the tent marked with yellow.
Now insert the fully yellow poles once assembled. One in each end. Now assemble the 4 aluminum poles with yellow hook ends. Each person grabs a pole and connects them to the ends of the fully yellow holes. Once again with the hook bend at the top to hold the ceiling up.
Now with the bottom of the yellow tipped aluminum poles you need to bring it into the center of each side where you connected the green aluminum poles to the pin on the base of the tent. Plug the end of the yellow pole into the pin. Do this on both ends of the tent with all 4 poles.
Now you should have a fully assembled inner layer of the Coleman Montana CV 12 person tent.
Step 4. Rain-fly
With the main foundation in place, the last step is to throw the rainfly over the top. To do this grab he two corners of the rainfly on the short side. Throw this over the top of the left hand end of the tent. The person on the other side will gran the rainfly and pull it towards them.
Next you need to walk the rest of the rain fly up towards the middle and throw the rainfly over. This step may require a small ladder as the tent ceiling is so high. But I managed to do it without a ladder, but I am not exactly short. Finally drag the rest of the fly to the right hand end of the tent.
Now the rainfly should be roughly in position. To correct it’s position you will need to pull on the ends and sides so that the rainflys windows match up with the inner layer windows. On the inner side of the rainfly are velcro straps. Use these to wrap around the poles of the tent. This will connect the fly to the tent.
Peg down the rainfly in the appropriate spots and use the included guylines to make your tent more resilient to rain and wind.
Assembling The Canopy On The Coleman Montana Gold 12CV Tent
The canopy is a great feature of the Coleman Montana. It creates a very large area for dining, cooking, reading and relaxing. But as mentioned earlier, it’s not ideal when it rains for long periods as the water pools up on top.
To assemble the canopy you will need to assemble the remaining 4 poles. These poles are not color coded so separating them at the beginning is easy. There will be 2 x longer poles and 2 x shorter poles.
First grab the 2 long poles. These go in the center of the front of the canopy. There will be 2 holes pre made where you insert the pointy bit of the poles through. These holes are located on either side of the door on the rain-fly. While one person holds the pole in place, use the attached guy lines to firmly tie down and peg down.
Next are the 2 shorter poles. They are for the 2 ends of the canopy. Again there will be a hole in either end so you can position the pointy end of the pole to go through. Guy and peg it down.
There will be loose rainfly material flapping on either ends on the outside of the shorter poles. On my tent the color of the fly bit was green. This bit gets pushed against the tent and then pegged down. What this does is creates a wind barrier for your canopy area. A very cool feature as it also provides your front area with privacy from neighboring campers.
If you only want the canopy above the front door you simply unzip the door section and use the 2 longer poles to hold up the canopy. Peg down the rest of the rainfly to protect the front of the tent from rain.
Concluding The Coleman 12CV Montana Tent Review
While I have set up this tent 3 times now, I have only used it once for camping. But so far it has impressed me greatly. After the initial set up, I can get this huge family tent up in about 10 minutes. Which is quite impressive for the size.
The shear amount of doors, rooms, windows and storage options make this tent one of the best car camping tents for families. I love the space, the option to walk out of any 4 doors and the fact it’s waterproof. Overall I can’t complain about anything. This tent has withstood solid rain, wind and 3 young kids. If you’re on the fence, I highly recommend buying the Coleman 12 Man Montana tent.