 Air mattresses are a very affordable alternative to traditional mattresses and can be comfortable and durable if you purchase a quality product. The downside of air mattresses is that a number of things can cause holes to appear. If one doesn’t know how to repair a air mattress hole quickly, a good nights sleep can turn sour quicker than you can close your eyelids.
If your mattress is losing a lot of air, you need to find where the leak is coming from and fix the hole as soon as possible. While a air bed/mattress is considerably cheaper than a standard bed, one doesn’t want to have to replace one every 6 months dues to a dodgy hole repair in the mattress. This can end up being expensive in the long run, so don’t delay that hole in the air bed any longer. It’s time to take action.
Quick Tip: An air mattress raised above the ground has less chance of springing a hole from foreign objects such as rocks, twigs and household items such as kids toys, pens, tacks etc. The best kind of raised air bed is an air mattress attached to a frame. This will eliminate much of the chance of punctures from foreign objects
How To Fix A Hole In A Air Bed Permanently
Step 1: How To Find Where The Hole In The Air Mattress Is
You might already know where your air mattress is losing air from. If not, remove the covers and sheets and put your air mattress up against a wall. In most cases, holes and tears can be found under the mattress. You might be able to see a hole or other signs of damages on the mattress.
If not, place your hands over the mattress to see if you can feel colder air coming out. If you still can’t find the leak, use a sponge to apply some soapy water over the surface of the mattress. You should see bubbles form where the mattress is losing air. Don’t forget to check the valve of the mattress, since this is a common location for leaks to appear.
Step 2: Prepare The Surface of The Air Bed
You need to do a few things before you can fix a hole in an air mattress. This first step is important, but many times it’s overlooked. Once you have located where the leak in the air bed is coming from, you need to clean the area that has been damaged. You can use water and dish soap or another type of chemical free cleaning product.
Try not to get any water in the holes and wait for the area to dry before moving on to the next step. If the surface of your air mattress has a textured that would make applying adhesive difficult, you may have to prepare the area by using sand paper.
Air mattresses often have one side that is covered in a suede-like material to make the mattress more comfortable. It is difficult to patch a hole in this type of surface unless you use sand paper to get rid of the suede-like texture in the area that needs to be fixed. Otherwise the patch may peel off in a quick amount of time.
Step 3: Fixing The Holes In The Air Mattress
Start by completely deflating your mattress since this will make fixing the holes easier. You can patch a hole in an air mattress by cutting a small piece of fabric from another air mattress you no longer use, from the inner tube of a bicycle tire or from many other items.
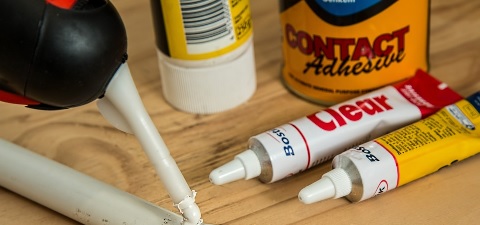
Look for a piece of fabric that will be durable so that you do not have to patch the hole again soon. You can also purchase a hole patching kit made for air mattresses or for tires to get a piece of fabric. You will also need a strong adhesive. All you have to do is place adhesive around the hole and place the piece of fabric over it.
Step 4: Wait For The Adhesive To Dry
Hooray, the hole in the air mattress is now covered. But before you get carried away and start inflating it you should be careful. You need to wait a few hours for the adhesive to dry before you can use your air mattress again. You will get better results if you place some books or another heavy item over the area to put pressure on the piece of fabric that you used to patch the hole.
Wait for at least two or three hours before checking to see if the piece of fabric is properly glued on the air mattress. You might have to wait longer depending on the type of adhesive you used. If you use a quick dry heavy duty adhesive, you will get far quicker drying times. But at the end of the day, you should allow maximum drying times so the hole in the air bed is not re-opened.
Step 5: Inspect Air mattress For Further Leaks
Now we have achieved a successful repair to the air mattress, we must check to see if not only that hole is fixed, but we should also go over the air bed again for any other holes that may have escaped our attention previously.
Inspect the piece of fabric you used to patch the hole to make sure the mattress has been properly fixed. If you can see that the adhesive wasn’t enough to fix the hole, add more adhesive and wait again. If you are not getting good results, remove the piece of fabric, clean the area and start again with a better adhesive.
If you feel the fabric is to blame for the hole still leaking air, then perhaps it’s time to buy a heavy duty repair kit or buy a new air mattress. Once you have got the air mattress to the stage where you’re confident the hole is fixed then it’s time to inflate the mattress once you are sure that the adhesive is completely dry and that the repair worked.
Fixing a hole in an air mattress is fairly easy and you can fix your air mattress without spending a lot of money. All you need to do is find a good adhesive and a piece of fabric you can use to patch the hole or simply purchase a hole repair kit for your air mattress. Make sure you follow this Air Mattress hole repair guide and allow for sufficient drying time.