 This is a family of 5 review of the Wanderer Manor 12 Person Dome tent. The Manor tent came into our lives out of pure misfortune. The reason we ended up buying this tent was that we had lost the poles to our previous family tent, the Coleman 12p Montana tent.
After a 7-hour drive to our campsite in North Haven, the chances of me driving back home to get the poles we left behind were slim to none. So I had to fork out the money to buy a new tent, and boy am I glad I did.
While this is not a comparison review between the two tents, it will be hard not to compare these two amazing tents. Both of which are the ideal tents for a family of 5.
How Many People Is This Tent Really Suited To?
The first step in deciding whether or not a tent is right for you and your family is to figure out if it’s large enough, or too big for your needs. The Manor tent is labeled as a 12 person tent, but by no means would I recommend 12 people actually camp in this tent at the same time.
Sure you could fit 4 people into each of the 3 rooms, but it’s going to be very crowded. Not too mention trying to sleep next to 11 other people snoring and making noises during the night.
So with that said, I would recommend a minimum of 4 people with a maximum of 7. For us, it was 5 people, 2 adults, and 3 kids.
3 Spacious Rooms
The design of this Manor tent is very similar to that of the Ozark Trails 12 person tent. Essentially, its a 4 area tent, with 3 of the areas being bedrooms. The fourth is the outdoor patio area. The design of the tent is a large square, with the 3 bedrooms creating the shape of a ‘L’. With the patio completing the shape to be a square.
I quite like this design, as it means you can fit the tent into more conventional shaped camping sites. With the Coleman Montana, the 3 rooms are lined up next to each other to form a rectangle shape, with it being over 11 meters long. This length can create issues when finding adequate sized campsites.
So the square design allows you to fit into most campsites, without compromising sleeping space. The only disadvantage to this design is that only 2 of the 3 rooms have entry doors. The corner room that has a bedroom on either side is the room that has no door, it does have 2 windows to allow air to circulate.
With the Coleman 12cv Montana, each of the 3 rooms has an entry and exit point, which I personally prefer, but I can also see the advantages to the Wanderer Manor tents design. The middle room which has no entry point would be ideal for keeping youngsters in the tent. By this I mean, if you don’t want you’re 2 year old escaping the tent without your knowledge, they can’t, unless they enter into room number 1 or 2.

Queen Beds For All
The best part about the Manor tent is that each of the 3 rooms can fit a queen size air mattress. But not only this you also get room along the sides of the mattress for walking and storing gear. For our set-up, we had the queen airbed, clothes and a camping cupboard in our room. With still enough room to safely walk in and out of the tent.
Setting Up The Wanderer Manor 12p Dome Tent
While the Manor is described as a dome tent, in reality, it’s more of a cabin tent. However, the assembly of the Maor is quite simple, which I guess you could say its as easy as a dome tent to set up.
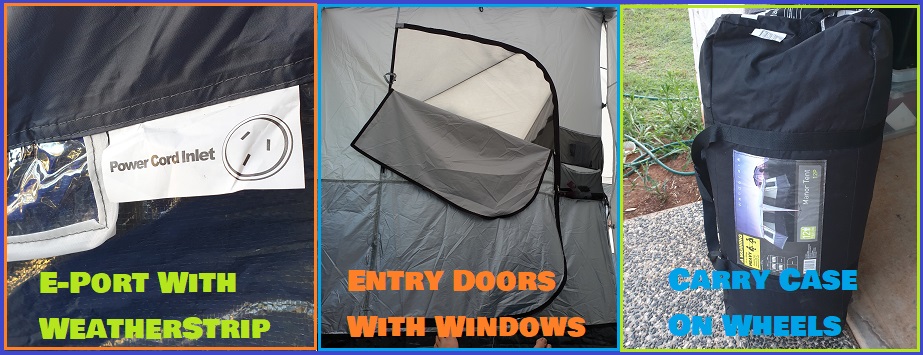
The tent comes with 2 sets of instructions, one in the form of a booklet, and the other is a quick setup guide sewn into the tents carry bag, which by the way has easy to use wheels on it.
Assembly Instructions
Once you have laid out the inner layer of the tent, you will notice the ‘hub’ located in the center of the tent. This is your primary focal point for setting up the tent. Its color-coded along with the poles. So assembly is as simple as attaching the poles together and inserting them into the relevant color plugs on the hub.
Once you have done this, the ceiling of the tent is basically set up. Next, all you need to do is attach the remaining poles to the poles you just installed. This will raise the tent at each end to form the cabin design.
Attaching The Rain Fly
The rain fly that comes with the Wanderer Manor tent is more like a hat than a full fly. So assembly is quite simple. It’s just a matter of dragging the fly over the top of the raised tent. Connect the fly to the tent with the ring and pull system at each pole.
One end of the fly is for going down the front corner of the tent where the patio area is. Take note of this part of the fly as it must be at the front of the tent.
Once you have clipped the fly to the poles connected to the central hub, all that remains is setting up the guy lines. The guy lines and stakes that come with the tent are pretty standard quality. Ideally, you will want to upgrade this to a more heavy-duty system.

What I Liked About The Wanderer 12P Manor Tent
I have briefly touched on a few things that I liked about this tent, but here’s a rundown on a few of the key features of the tent.
- 3000mm coated fly for decent protection against rain.
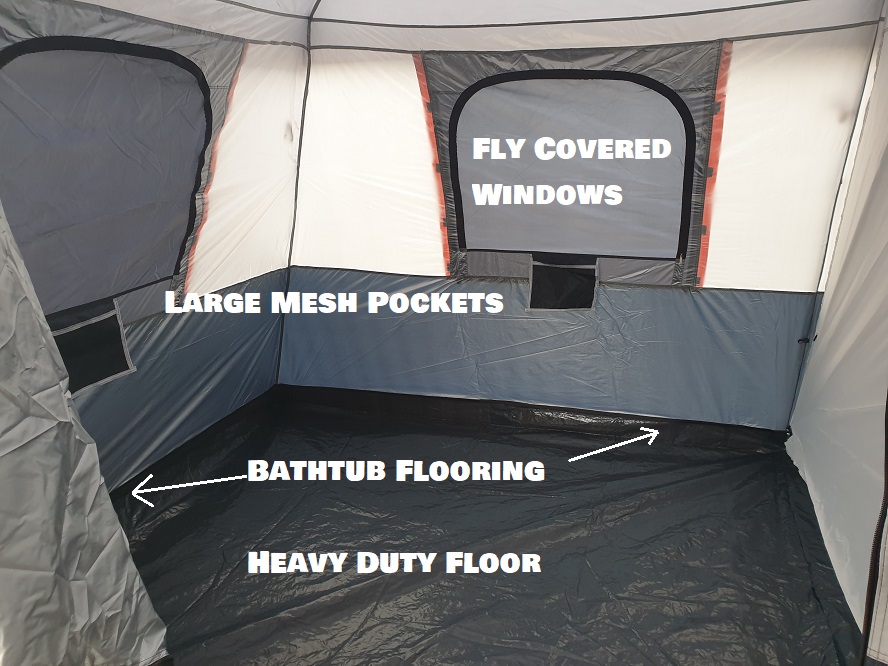
- Ample amounts of storage pockets. 2 big pockets to store your valuables inside the tent.
- E-Port access with a weather strip above the port to prevent water from coming inside the tent.
- I like how the 2 doors have windows built into them, so at night you can leave the window open on the door to allow cooler air to enter the tent.
- Extremely tall ceilings, making it one of the best tents for tall people. I’m a fraction over 6 feet tall and yet the top of the ceiling was still at least a foot taller than me.
- Bathtub floors that came up the sides of the wall at least 6 inches. This helps to keep groundwater from flooding into the tent.
- The patio area is quite large, big enough that you can leave your gazebo at home and utilize this area instead.
- Access to the outside fly on the windows can be achieved from inside the tent, great for when it’s about to rain on you and you need to close the fly on the windows.
- Everything fits back into the carry bag (on wheels), including all the poles and pegs. The reason we forgot the poles on the Coleman Montana was that the poles didn’t fit back into its carry case, and they got left behind.

Reviewing The Wanderer Manor 12P Tent For Extreme Weather
So that’s pretty much everything I like about this tent, but now comes the section on the parts that didn’t impress me a great deal.
Is The Wanderer Manor Waterproof?
I might need to update this potential con as we had to buy this tent on the day of camping and set it up at sunset. So I had no chance to apply additional waterproofing to the tent. But you may be thinking, do you really need to put waterproof on a brand new tent?
The answer is yes you should. Adding additional protection to a new tent is highly recommended and unfortunately, I was 7 hours from home and didn’t get the chance to add it to the Manor tent.
The Result?
The first 2 nights we camped, it rained and quite heavily. This did worry me somewhat as I new the tent had bare minimal protection and the rain fly was not a full length fly like on my other tent, the Coleman Montana.
So the tent leaked, but not a huge amount. So the 3000mm coating of waterproofing on the fly did its job, but the water still managed to leak in through parts of the inner layer of tent. This is why I recommend adding an additional coat of waterproof to this tent.
Did it leak enough to warrant this tent as useless? No, it wasn’t a great deal of water and considering it rained for 2 days straight, I thought the tent held up pretty good. However, if you have the time, set up the tent in your backyard and spray some waterproof spray all over the walls of the tent.
How Did It Hold Up In The Wind?
After the rain stopped, we got 5 days of high winds around the 40-50kmph mark. This sure was a good test for the cabin-style tent as typically speaking, they are not the best tents for high winds.
After a day’s fishing, I returned back to the tent to discover the back end of the tent had caved in on itself. At first, I was very disappointed in the tent, but after further inspection, the fix was quite simple. The corner joints where the poles connect from the ground into the hub had turned 90°, allowing the pressure of the wind to push the walls of the tent in on itself.
This may be due to human error setting up the tent as we were setting up in a hurry to beat the rain and sun was fading fast. So this section will be updated after the next camping trip in high winds using the Wanderer Manor.
No Ground Vents
Another aspect of the tent that didn’t impress me was the lack of ground vents. These vents allow you to keep air flowing inside the tent while the windows have their fly to keep out the rain.
But in saying that, because this tent is a square design with a front porch, you can leave the windows on the 2 entry doors open. This will allow fresh air to circulate inside the tent when it’s raining, without getting wet. But ultimately, I would have liked the addition of a ground vent, particularly in the corner room for extra air circulation.
Wanderer 12P Manor Tent Review Conclusion
While the decision to purchase this tent was a forced one, I’m glad I got the chance to camp in this tent for 10 nights. Allowing me to review this tent for what it is, a great family cabin tent.
While the tent is not perfect, after my initial 10 days with this tent, I can’t complain too much. The wind and rain test will have to be reassessed at a further date, but on the whole, I think it did a pretty good job considering it was under constant attack from wind and rain.
For me, its the square design with the tall ceilings and patio area that make this tent stand out. With the Coleman Montana tent, the awning on it didn’t offer great wind or rain protection, whereas the Wanderer Manor utilizes the walls of the tent to create a wind and rainproof outside dining area.

Donna Amato
Sunday 3rd of January 2021
Our Wanderer Manor 12P has just been through winds, downpour of heavy rain and there were no leaks or anything. Just like anything it shook in the wind and you cannot help but veer your eyes to the centre connections (moving like earthquake plates). I can assure you the tent stood the test of mother nature. The key to not having any leaks was that we do not let any of our bedding or bags or anything touch the sides. This is also New Zealand weather. The first time we used the tent there were 12 adults and 1 baby. We managed because we're used to living marae styles. This time there is 4 adults and 2 children and our sleeping quarters only used half the side of the tent. We used the other inner part for storing our bags and clothes. Plenty of room. We are all tall people 5ft 8, 6 foot and upwards and we all love how we can stand straight up and no bending. Love the whole set up. Other campers admire our Manor motel as we call it.
admin
Tuesday 5th of January 2021
Hi Donna, thanks for sharing your review of the 12p Manor tent. Since originally writing this review, I have grown to love this tent. It is very spacious and the high ceilings as you mentioned are just great fro adults. We have put this tent through some heavy rain and winds also. The trick to fixing the issue we had is to follow the instructions and peg down the tent foundation first before setting up the walls. Does wonders haha.